Accounts
- Accounts Overview
- Student Accounts
- Password Change Procedure
- Lunch Barcodes
- Change Password through Classlink
- Multi-Factor Authentication
Accounts Overview
This article aims to demystify how logins work in Princeton ISD. If you have any questions that are not addressed here, please call 2099 for assistance.
Terms
| Source of Authority (SOA) | A Source of Authority (SOA) as it applies in Technology is a system that provides the official record of something. Other systems will get their information from their SOA. For example: Infinite Campus is the SOA for basic student information and rostering. |
| Identity Provider (IdP) | An Identity Provider (IdP) is an SOA for user logins. An IdP is used to tell a system that you are logging in to whether your login credentials are valid. |
| Active Directory (AD) | Active Directory (AD) is a database of user login information. It is used to authenticate several district systems including any computer that is not a Chrome device. It is also a SOA for certain services. This is sometimes referred to as your "network login." |
| Single Sign-On (SSO) | Single Sign-On (SSO) is a technology that allows a service like Google or ClassLink to act as an IdP for another service. There are several types of SSO but they are all essentially one service sending information to another service to allow you to log in without typing a password. For example: When you log in to ClassLink and click on the Pearson icon, ClassLink tells Pearson to log you in. You do not have to enter a password in Pearson because ClassLink tells Pearson who you are. |
Overview
Every person in Princeton ISD has at least two logins. One is stored in Active Directory (AD) and one is stored in Google. These logins are not connected in any way and it is possible for usernames and passwords to differ between these systems.
Your AD login is used when logging in to any computer that is not a Chrome device. It is also used for logging in to services like the Knowledge Base and ClassLink.
Your Google login is used when logging in to a Chrome device like a Chromebook. It can also be used to log in to 3rd-party websites and to ClassLink (assuming you have linked your Google account to ClassLink).
ClassLink
What is Classlink?
ClassLink is a tool for simplifying the task of logging in to multiple services within an educational environment. It also provides access to your U: and P: drives from anywhere with an internet connection. Behind the scenes, it handles creating accounts in several of the 3rd-party services that we use in the district and acts as an SSO provider for many of these services. There is a section of the Knowledge Base dedicated to ClassLink which is located here.
Why do I need ClassLink?
Most 3rd-party resources that are provided by the district use ClassLink to log in. This is accomplished using Single Sign-On technology or by automatically filling passwords on supported sites. A full list of supported sites is available here. It can also be used to store and fill credentials in other websites that are not directly rostered by the technology department.
Please Note: Websites that use auto-fill to log in will have a brief delay between the website appearing and the form being filled. Please do not enter any credentials while this is happening as it may interrupt the process.
How do I log in to ClassLink?
ClassLink used Active Directory as it's Identity Provider. Because of that, you can use your AD credentials to log in to ClassLink. ClassLink also supports using Single Sign-On with Google. This allows for quicker logins to ClassLink if you are already logged in to your Google account. In order for this process to work your ClassLink account must be linked to your Google account. This process must be completed by every person. Instructions are located here.
FAQ
- How are student accounts created?
- How do I log in to...?
- ClassLink says Not Connected when I try to log in with Google
- My students are constantly having trouble with passwords. What is happening?
-
My students are trying to log in to a district provided site but their logins are not working.
- What grade levels are required to change their passwords?
How are student accounts created?
Student accounts are created automatically using data pulled from Infinite Campus. A detailed article has been written on the subject which is located here.
Please note: You must be logged in to the knowledge base to see the article. The Knowledge Base uses your AD login.
How do I log in to...?
- If the service is part of this list (link) use ClassLink to log in.
- If you are trying to log in to the Princeton ISD website put in a ticket so that our webmaster can assist you with getting logged in.
- If you are trying to log in to Eduphoria, your username is your district email. If prompted for a password, enter any text and proceed with the login. You will be redirected through ClassLink for authentication.
- If you are trying to log in to the TEKS Resource System your username will be your Princeton ISD email. If you are unable to reset your password, put in a ticket so that we can assist you further.
- If you are trying to log in to Infinite Campus contact your campus PEIMS coordinator.
My students are trying to log in to a district provided site but their logins are not working.
There are several issues that can arise when attempting to log in to a service via ClassLink. Most are listed below along with some troubleshooting steps.
| Students report invalid password/access denied |
This is usually one of two issues.
|
| Students are prompted by ClassLink to enter a password |
|
To get a student's AD or Google password reset please put in a ticket under the Password Reset category or call 2099.
What grade levels are required to change their passwords?
Starting in 6th grade, students are required to change their password when they log in for the first time and after every password reset. This aids in protecting their district accounts and data from being compromised.
Student Accounts
Active Directory (Computer/ClassLink Logins)
Summary
Student usernames and passwords can be found in the Rostering Portal if you are a teacher or media specialist. All students must have a complex password but only students 6th and up have to come up with their own. Teachers of PK-5th students are able to print quick cards for their students to log in without a password. See Quick Card Instructions.
Username
Student usernames are comprised of their first initial, last initial, and their student ID.
EG: For a student named Bobby Tables with a student ID of 012345, the username would be BT012345
This applies to all students except out of district students. Because these students may not have unique student IDs, their InfiniteCampus PersonID is used instead and "CATE." is prepended to their username. The student's PersonID is available on the Summary page for that student in InfiniteCampus.
EG: For a student named Bobby Tables with a PersonID of 01234, the username would be CATE.BT01234
Password
Passwords are for students are randomly generated when the student's account is created. Any time a student's password is reset, their credentials revert to the password that was generated when their account was created. Teachers can reset passwords for their students and generate login sheets using the Rostering portal at https://rostering.princetonisd.net. Student passwords must meet complexity requirements regardless of grade level.
PK-5th
Students can use Quick Cards to log in without a password. Teachers are able to print quick cards for their students using the instructions linked below. Students are also not required to change their password. We recommend getting students used to setting and remembering passwords in 4th and 5th grade to ease their transition to middle school.
6th-Graduation
Students are required to set and remember a complex password when they log in after a password reset.
Password Complexity
All student accounts must use "complex" passwords. Complexity is defined as being a minimum of six characters in length and containing characters from three of the four categories below. The password must not contain the student's name or username.
- Uppercase letters (A-Z)
- Lowercase letters (a-z)
- Numbers (0-9)
- Special characters
Password Change Procedure
Active Directory (Computer/ClassLink)
If you have forgotten your password and need it to be reset, please enter a HelpDesk ticket or call the HelpDesk extension.
If you are using a Chromebook or personal device, use the instructions here.
- Press Ctrl + Alt + Delete on your keyboard
- Click "Change a password"
- Enter your old password in the "Old password" box
- Enter your new password in the "New password" box
- Enter your new password again in the "Confirm password" box to confirm
- Press Enter on the keyboard to submit.
Password Requirements
Passwords must be a minimum of six characters in length and must contain characters from three of the four categories below. The password must not contain your name or username.
- Uppercase letters (A-Z)
- Lowercase letters (a-z)
- Numbers (0-9)
- Special characters
Lunch Barcodes
Printing Lunch Barcodes
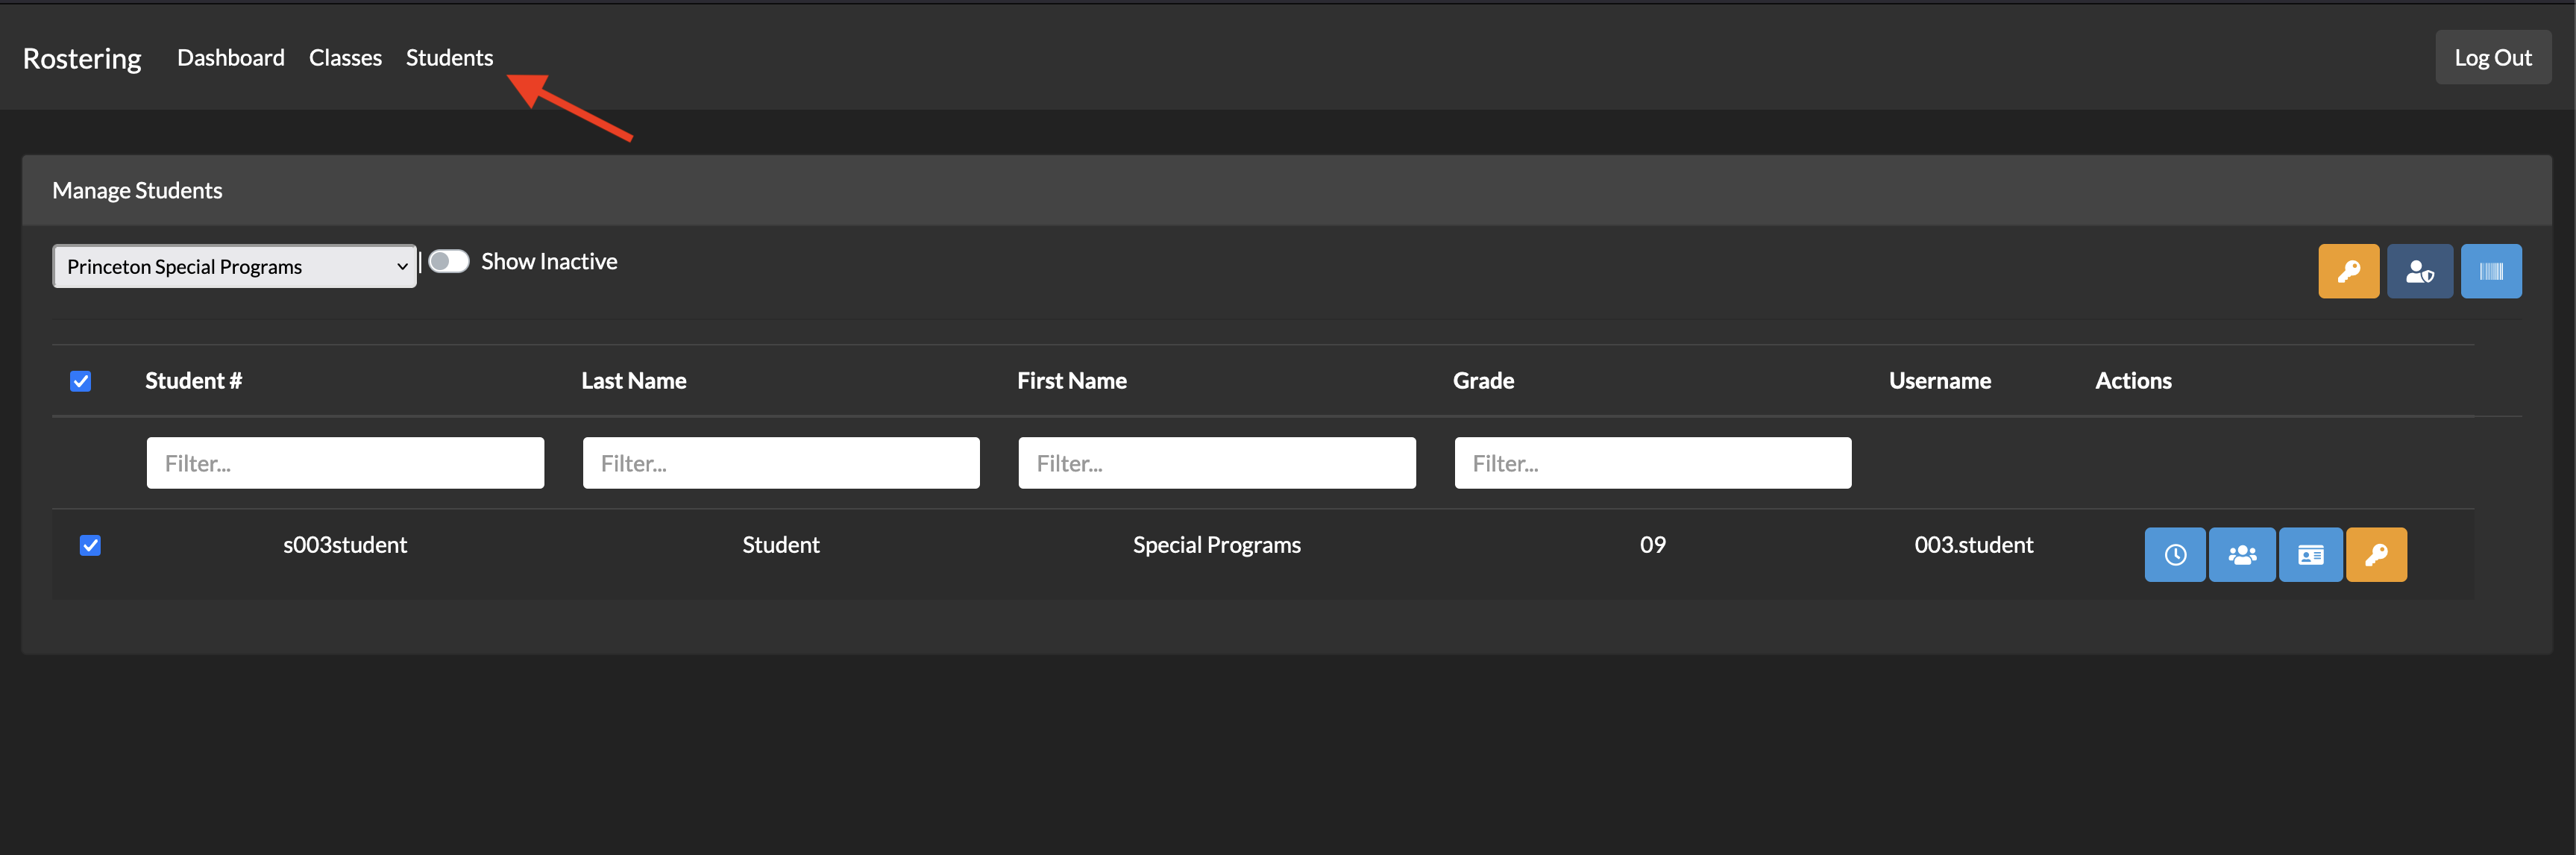
Teachers are able to print lunch barcodes for their students using the Rostering Portal available in ClassLink.
- Click on the Rostering Portal in ClassLink. (Alternatively, go to https://rostering.princetonisd.net and click Sign In with ClassLink)
- On the top of the page, click Students

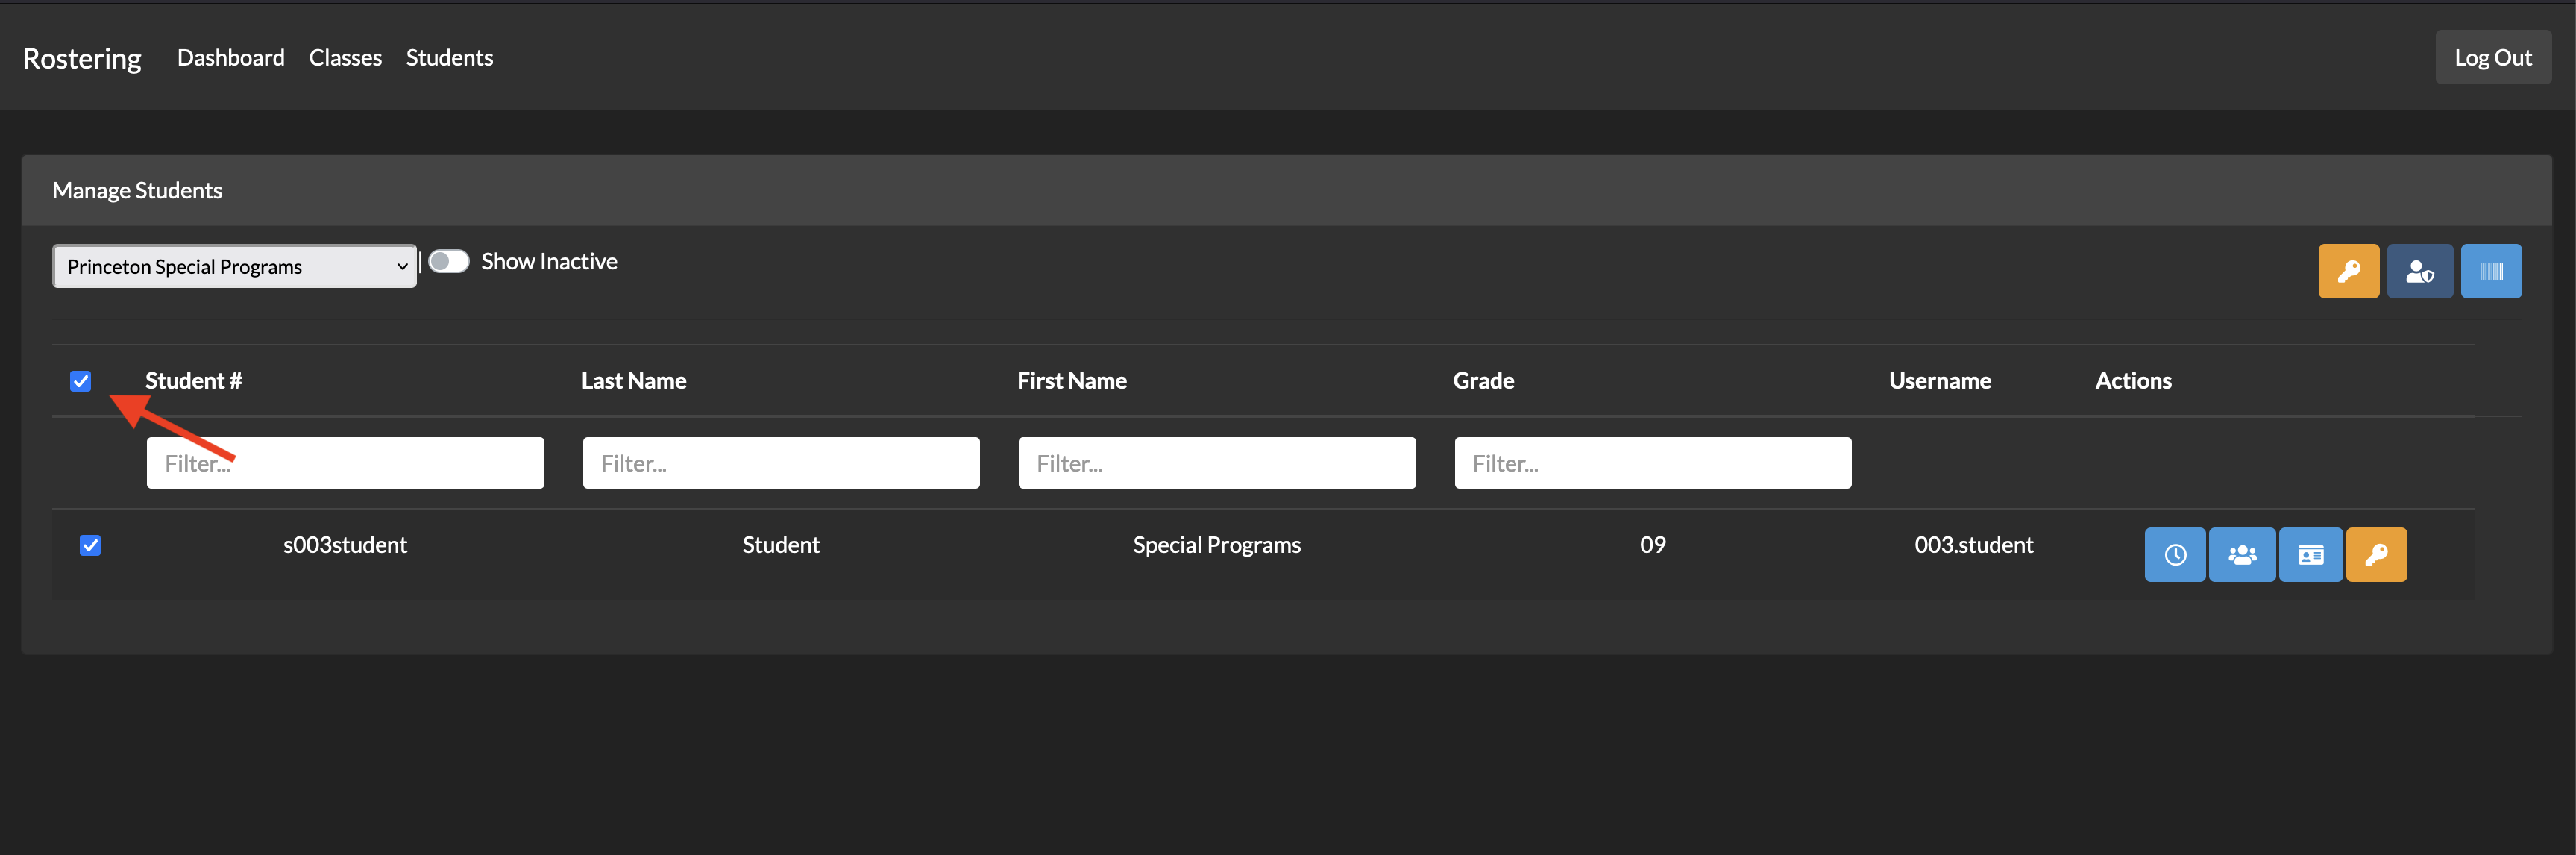
- Select the students you want to print using the check boxes on the left

- To select all students, click the check box on the header row

- To select all students, click the check box on the header row
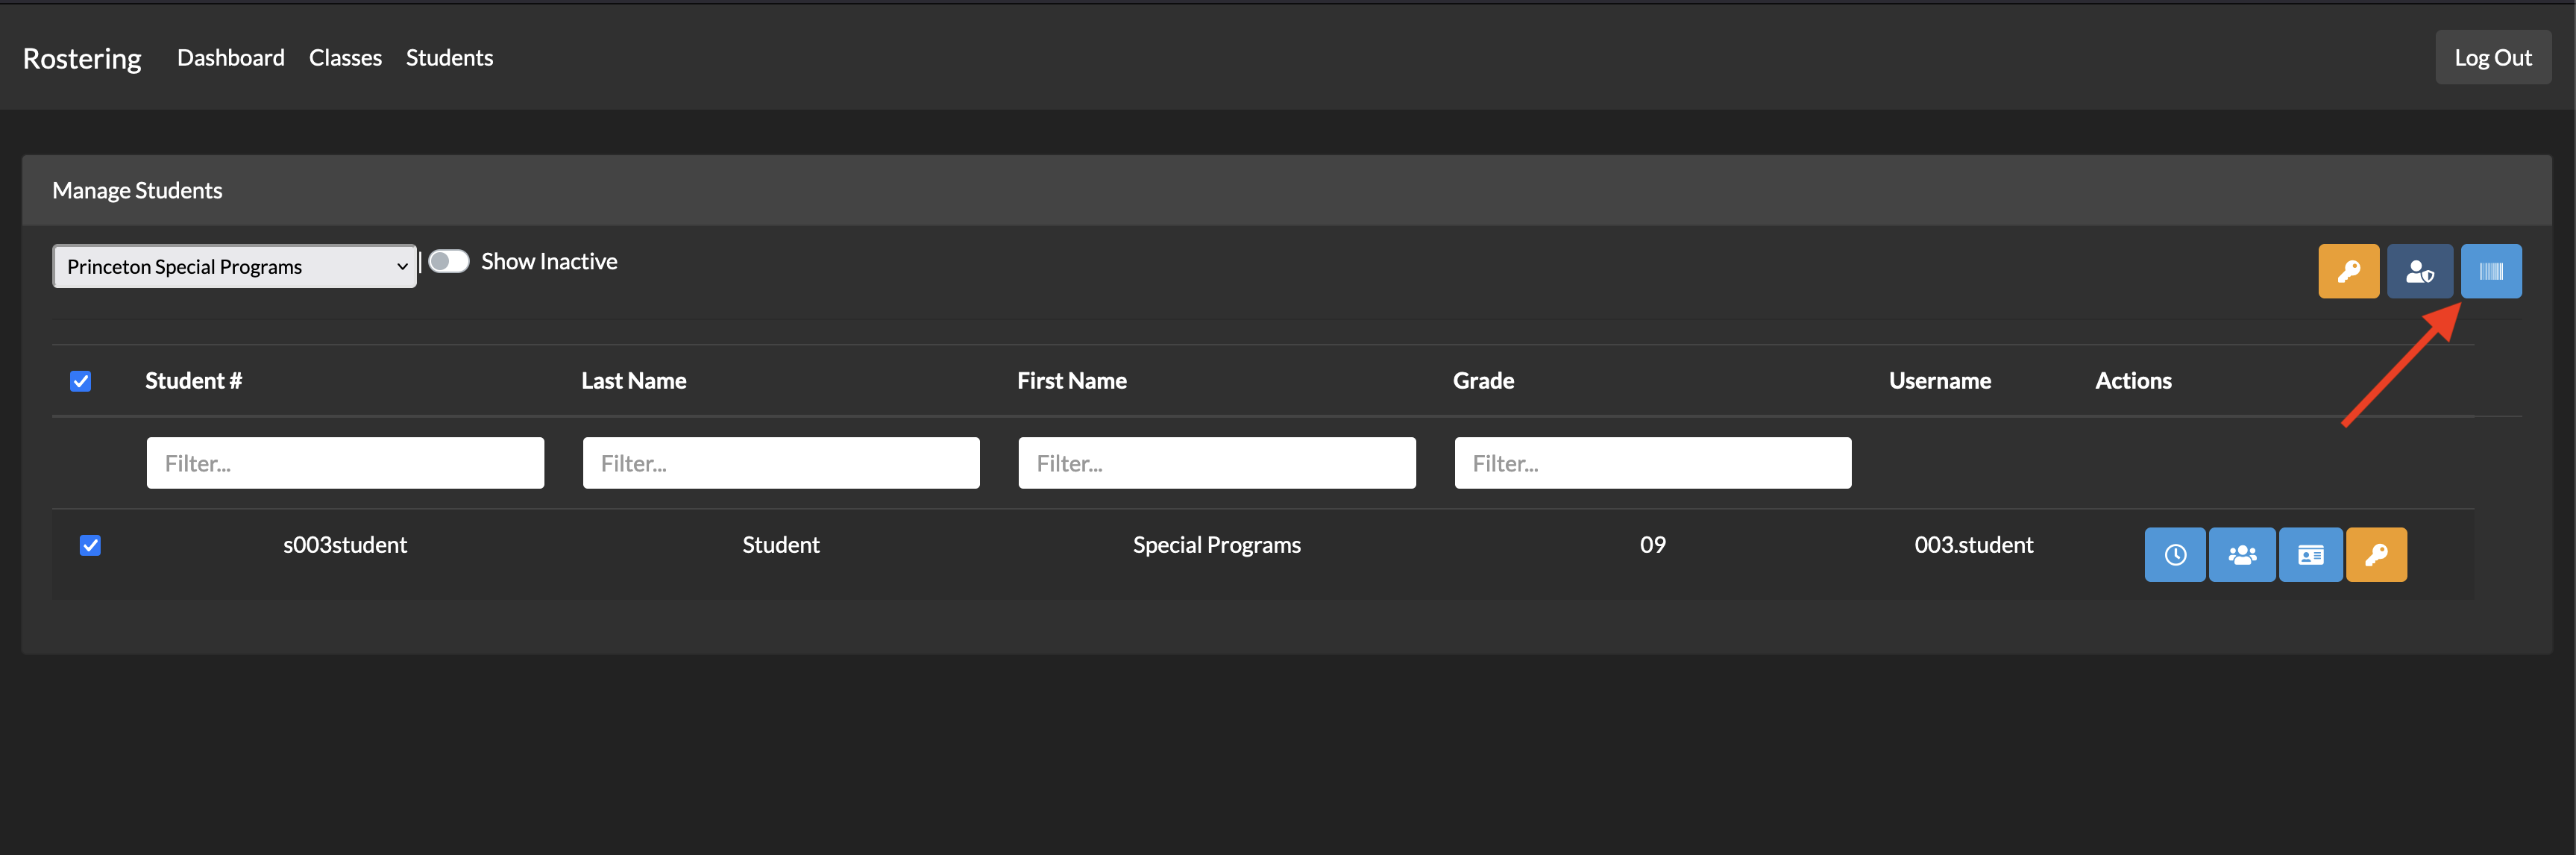
- Click the light blue barcode button at the top-right of the Manage Students box

- A PDF will be generated which can then be printed, cut, and laminated

Change Password through Classlink
Overview
There are several situations where a student or staff member may be logged into their account and want to change their password. This can be done through the Classlink Launchpad. This document outlines the steps needed to change your computer/Classlink password.
Procedure
This procedure will change your password for BOTH Classlink and your computer login.
- Go to the Classlink Launchpad
- Locate your Classlink Profile in the upper-right corner
- Select the down-arrow next to your Classlink Profile
- Select SETTINGS in the drop-down menu
- Go to the RECOVERY tab
- Select the CHANGE PASSWORD button
- Enter your old password in the first field
- Enter your new password in the last 2 fields
- Select SAVE in the lower-right corner
This new password will take effect immediately.
Password Requirements
Passwords must be a minimum of six characters in length and must contain characters from three of the four categories below. The password must not contain your name or username.
- Uppercase letters (A-Z)
- Lowercase letters (a-z)
- Numbers (0-9)
- Special characters
Multi-Factor Authentication
Looking to move on with your life as quickly as possible? Skip to the How to set up MFA section. Once you get there, we recommend choosing the Mobile Authenticator method.
If you are using MFA and would like to provide feedback on your experience, click here.
What is Multi-Factor Authentication?
Multi-factor authentication (sometimes referred to as "MFA", "2FA", or "two-factor authentication") is an additional layer of security that can be applied to many modern web-based accounts. It comes in many different forms, but they all perform the same function.
When you attempt to log in with a 2FA-enabled account on a new device, you are prompted to enter the usual username-password combination, but are then prompted to enter a verification code from whichever authentication method(s) you have set up. These methods for providing codes typically depend on having your cell phone with you.
By adding these codes to the sign-in process, this prevents any unauthorized users from accessing your account without your knowledge even if they have your password.
If you have signed into a device before using 2FA, you will not be prompted to enter a verification code again, unless you have had your password reset. You will need to enter a verification code while signing in if you are attempting to sign in on a new device or web browser as well.
Types of Multi-Factor Authentication
There are three main types of MFA supported in Princeton ISD. Click on the sections below to learn more about them. Our recommendation is to use a Mobile Authenticator App.
Mobile Authenticator
You may get a phone application on IOS and Android devices that provide the verification code. These codes are time-sensitive, and are only valid while they appear onscreen in your app. These time-sensitive codes prevent unauthorized users from logging into your account by resetting the codes every 30 seconds, and only being accessible on your phone.
An example of what the authenticator app looks like is shown below. Each code is associated with a different account, which may be Classlink, email, banking, Amazon, etc. Notice the timer wheel to the right of each code, which shows you how much longer that code is valid for. Do not feel pressured to enter the code before that timer completes. Sometimes it is necessary to wait until a new code appears, allowing you plenty of time to enter the new code.

SMS (Text Message)
You may also receive a text message containing a time-sensitive code as well. This prevents you from needing to download another application, but these codes usually stay valid for much longer. Text message and data rates may apply. While this method is still quite secure, it is less secure than the authenticator option, since the codes stay valid for much longer, and may be bypassed more easily.
Once the code is sent to your phone, you will be able to enter it on your device to finish the sign-in process. Once logged in, it is recommended to delete the text message.
Image
The Image option should only be used by students.
This final option is the least secure of the three presented here. You will select an image which you must remember, and then will need to select the correct image upon signing in to verify it is you.
While it is very simple to use, it is much more susceptible to random guessing, and so we only recommend using this option if you do not have a cell phone.
How to set up MFA
If you are being prompted with a screen that says Multi-Factor Authentication Setup immediately after logging in to ClassLink, click I am being prompted to set up MFA below. Otherwise, click I am choosing to set up MFA.
I am being prompted to set up MFA
- From the Select MFA dropdown, select your preferred MFA method. Again, we strongly suggest using a mobile authenticator app. For more instructions, click on the section below that corresponds to the option you chose.
Mobile (Recommended)
There are many options to choose from when selecting an authenticator app. Most will work but we suggest using one of the options below. Download and set up an authenticator app from your device's app store before proceeding.
- Google Authenticator (Use a personal Google account, do not use your Princeton ISD email)
- Twilio Authy
- Selecting Mobile Authenticator should pull up a new window with a QR code.
- Open your authenticator app and locate the + button
- Google Authenticator: a rainbow-colored + button at the bottom of the app's screen
- Twilio Authy: a + button with Add Account in the middle of the app's screen
- Select the appropriate button for scanning a QR code.
- If prompted, be sure to give the app access to your camera.
- Scan the QR code from your ClassLink page with the app
- Enter the new code from your authenticator app at the bottom of the ClassLink page
- Click Save
You're all set! You may be asked to enter a code from your authenticator app next time you log in.
SMS (Text Message)
- Once you select select Mobile SMS, enter your phone number
- Click the Save button
- Enter the verification code that was sent to your phone via text message.
- If you do not receive the text message within 1 minute, click RESEND CODE
- After entering the verification code, click Submit
You're all set! You may be asked to enter a text message code next time you log in.
Image (Weakest)
The Image option should only be used by students.
On the following screen, select an image that you will remember then click the Save button
Note: you can scroll further to view more images than the ones initially shown.

I am choosing to set up MFA
- Login to ClassLink
- Click on the user profile button in the top-right of your screen

- Next, click on Settings

- Click on "Security".

- From the Select MFA dropdown, select your preferred MFA method. Again, we strongly suggest using a mobile authenticator app. Click on the button below that corresponds to the option you chose for more instructions.
Mobile Authenticator (Recommended)
There are many options to choose from when selecting an authenticator app. Most will work but we suggest using one of the options below. Download and set up an authenticator app from your device's app store before proceeding.
- Google Authenticator (Use a personal Google account, do not use your Princeton ISD email)
- Twilio Authy
- Selecting Mobile Authenticator should pull up a new window with a QR code.
- Open your authenticator app and locate the + button
- Google Authenticator: a rainbow-colored + button at the bottom of the app's screen
- Twilio Authy: a + button with Add Account in the middle of the app's screen
- Select the appropriate button for scanning a QR code.
- If prompted, be sure to give the app access to your camera.
- Scan the QR code from your ClassLink page with the app
- Enter the new code from your authenticator app at the bottom of the ClassLink page
- Click Save
- After the page updates, make sure you see a blue Enabled next to the Mobile Authenticator option. If it says Disabled, click Re-enable
You're all set! You may be asked to enter a code from your authenticator app next time you log in.
Mobile SMS (Text Message)
- Once you select select Mobile SMS, enter your phone number
- Click the Save button
- Enter the verification code that was sent to your phone via text message.
- If you do not receive the text message within 1 minute, click RESEND CODE
- After entering the verification code, click Submit
- After the page updates, make sure you see a blue Enabled next to the Mobile SMS option. If it says Disabled, click Re-enable
You're all set! You may be asked to enter a text message code next time you log in.
Image (Weakest)
The Image option should only be used by students.
On the following screen, select an image that you will remember then click the Save button
Note: you can scroll further to view more images than the ones initially shown.