# Chromebook

# WiFi Recovery

This procedure explains how to connect a Chromebook to the temporary Recovery network to recover from the loss of WiFi settings. This will allow normal use of the Chromebook until a fix can be pushed.

1. Power on the Chromebook
2. A **Network not available** screen should be displayed
3. From the dropdown, select **Recovery[![IMG_0554.jpg](https://kb.princetonisd.net/uploads/images/gallery/2017-12-Dec/scaled-840-0/IMG_0554.jpg)](https://kb.princetonisd.net/uploads/images/gallery/2017-12-Dec/IMG_0554.jpg)**
4. Once the network connects, a login screen will appear

# Chromebook Functionality Check

When repairing a chromebook or assessing it for damage, please follow the following procedures when either determining if a chromebook needs repairs or to check that the chromebook is fully functioning after it has been repaired:

#### 1. Wipe Chromebook

If any chromebook is brought in for repairs, it needs to be wiped first.

Power down the chromebook. Hold down Escape and Refresh(the arrow in a circle) and push the power button. When the OS recovery screen loads, hit CTRL-D. Press the key that is listed to turn OS verification off. This is usually space or enter. When the chromebook switches to OS Verification is off, press the key to turn OS verification ON. This is usually space or enter. If requested, hit Enter to confirm.

The chromebook will reboot a few times and will eventually will come back to the setup screen. Connect the chromebook to PISD-Public when prompted for a network, and continue setup. The chromebook should come up to an enterprise enrollment screen. If it loads to a normal google login screen, hit CTRL-ALT-E to load enterprise enrollment. Log in with your district email and continue the setup. Once the Chromebook is at the log in screen, log in and continue the steps below.

#### 2. Check for updates

Once logged in to the Chromebook, click the clock in the bottom right corner, and click the settings gear in the window that opens.

In the new window, click the About Chrome OS tab and click 'Check for Updates'

#### 3. Verify Mouse

In Chrome, open [keyboardtester.co/mouse-click-tester](https://keyboardtester.co/mouse-click-tester)

Click the touchpad in and/or press the left and right click buttons where applicable to verify that the inputs are registering.

##### 4. Verify Touch Screen

In Chrome, open [kleki.com](https://kleki.com/)

Using the touchscreen, draw on the screen from edge to edge and corner to corner to verify the touchscreen is working.

#### 5. Verify Keyboard

In Chrome, open [keyboardtester.co/keyboard-tester](https://keyboardtester.co/keyboard-tester)

Press each key on the keyboard and verify that it turns green in the webpage.

#### 6. Verify Speakers/Microphone

In chrome, open [mictests.com](https://mictests.com)

Use the 'test my mic' button to make a recording and play the recording back. You will need to allow access when asked in Chrome. Please verify that you can hear the recording properly. If not, the mic or speakers may be faulty.

#### 7. Verify Webcam

In chrome, open [webcamtests.com](https://webcamtests.com)

Once your webcam is loaded, click the 'Test my cam' button. You will need to allow access when asked in Chrome. Please verify that you can see the webcam properly. If not, the webcam may be faulty.

# Chromebook Manager Overview

### Lock and Unlock Devices

<p class="callout info">Loaner devices and 1:1 devices that are not checked out will be locked nightly.</p>

1. Log in to Chromebook Manager ([https://chromebooks.princetonisd.net](https://chromebooks.princetonisd.net))
2. Use the checkboxes to select devices to lock or unlock (if you want to select devices by scanning their barcodes skip this step)  
    ![Screenshot 2025-02-11 at 8.49.09 AM.png](https://kb.princetonisd.net/uploads/images/gallery/2025-02/scaled-1680-/mmRvR9ZvXlZHObqA-screenshot-2025-02-11-at-8-49-09-am.png)
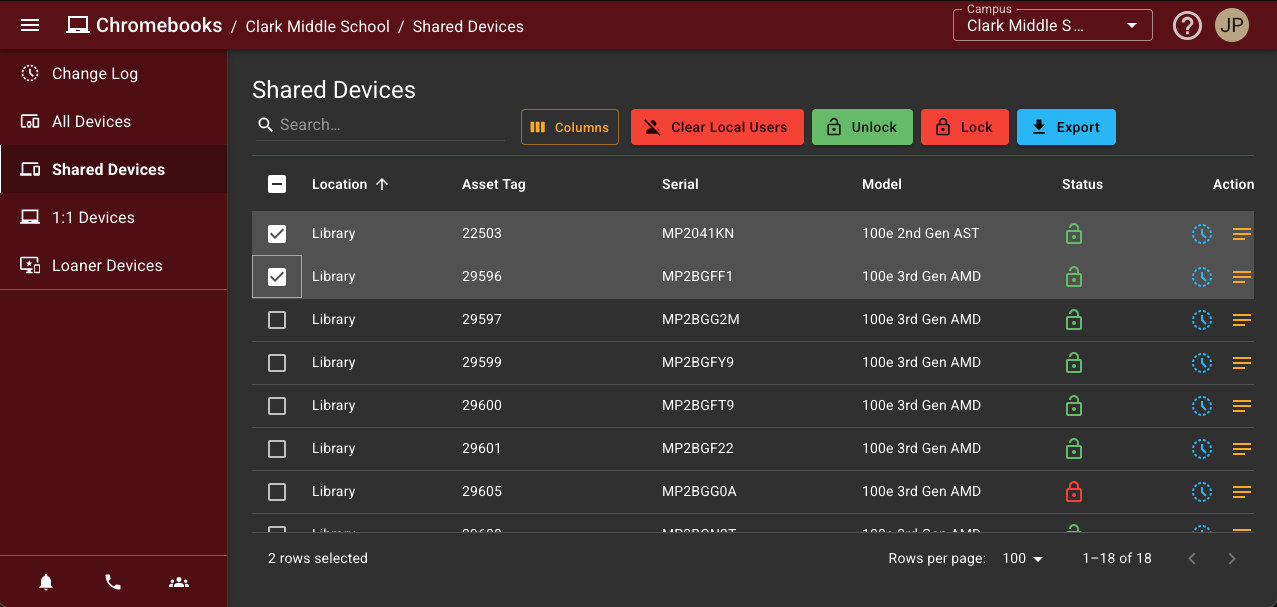
3. Click **Lock** or **Unlock** at the top of the page
4. At this point, you can select additional devices by scanning their barcode into the "Scan Asset Tag" field or remove devices by clicking the red X on the right side of their row.  
    ![Screenshot 2025-02-11 at 8.49.52 AM.png](https://kb.princetonisd.net/uploads/images/gallery/2025-02/scaled-1680-/jSeNlCxCMTmOoXR0-screenshot-2025-02-11-at-8-49-52-am.png)
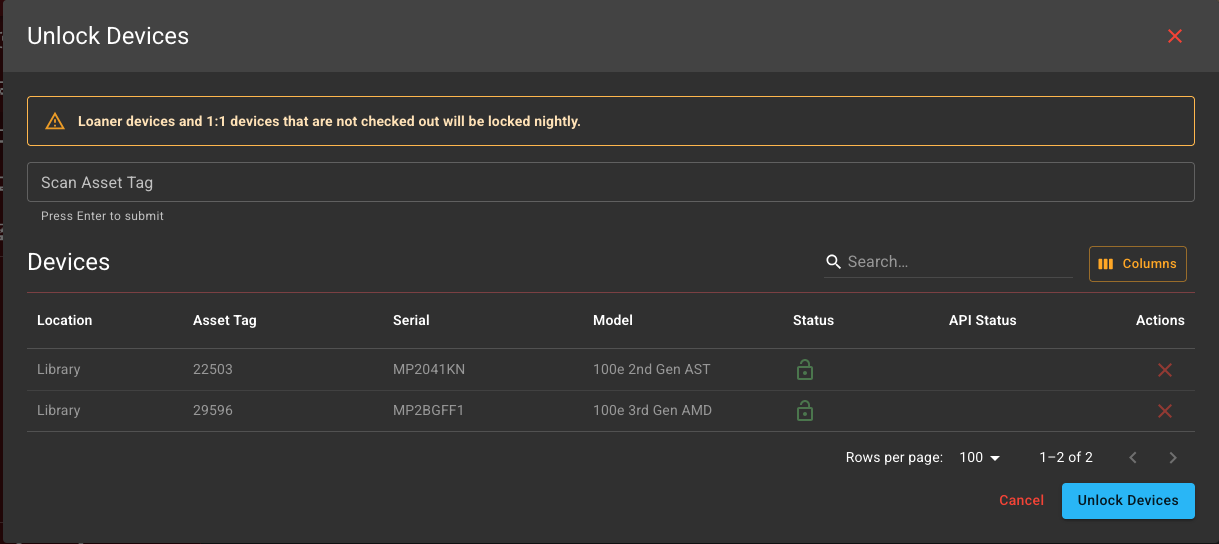
5. Click **Lock Devices** or **Unlock Devices**
6. Wait for the requests to process. You will see the status of each request update in the view

### Clear Local Users (Powerwash)

<p class="callout info">Note: The action will take place the next time the device is powered on and connected to the network.</p>

<p class="callout warning">All local user data will be cleared. This action is irreversible.</p>

1. Log in to Chromebook Manager ([https://chromebooks.princetonisd.net](https://chromebooks.princetonisd.net))
2. Use the checkboxes to select devices to lock or unlock (if you want to select devices by scanning their barcodes skip this step)  
    ![Screenshot 2025-02-11 at 8.49.09 AM.png](https://kb.princetonisd.net/uploads/images/gallery/2025-02/scaled-1680-/mmRvR9ZvXlZHObqA-screenshot-2025-02-11-at-8-49-09-am.png)
3. Click **Clear Local Users** at the top of the page
4. At this point, you can select additional devices by scanning their barcode into the "Scan Asset Tag" field or remove devices by clicking the red X on the right side of their row.  
    ![Screenshot 2025-02-11 at 8.54.27 AM.png](https://kb.princetonisd.net/uploads/images/gallery/2025-02/WX83AaN2RI3Umg7y-screenshot-2025-02-11-at-8-54-27-am.png)
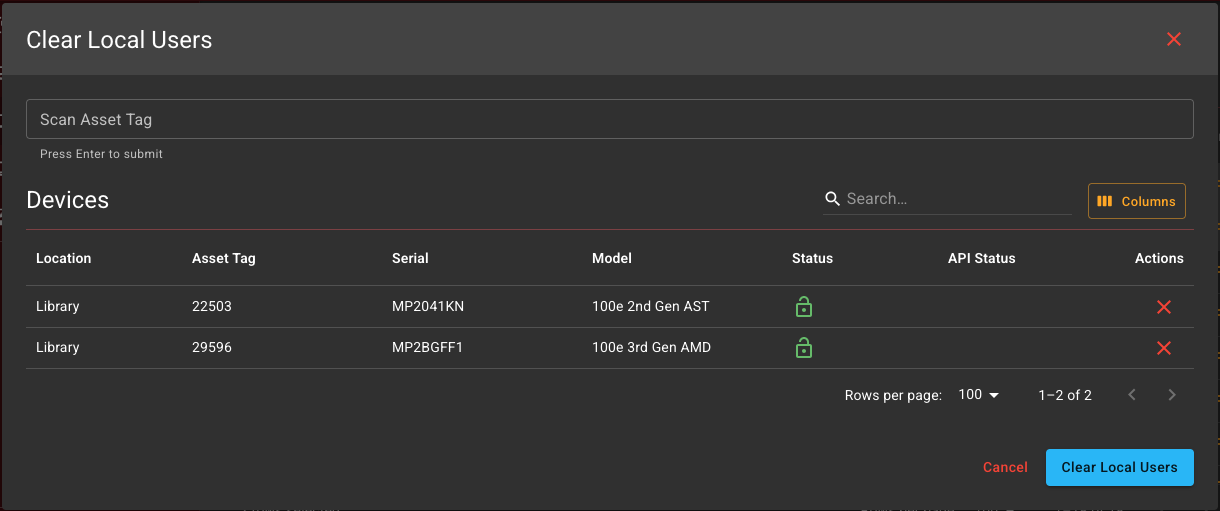
5. Click **Clear Local Users**
6. Wait for the requests to process. You will see the status of each request update in the view

### Change Log

You can view past actions and their results on the Change Log page. Actions with a Pending status have not yet been completed. You do not need to attempt these actions again. They will be completed the next time the device is powered on and connected to the network.

# Eduphoria Lockdown Testing

<p class="callout info">These instructions apply to **Eduphoria testing** on **Chromebooks** only.</p>

These steps will need to be completed by each student for each testing session. The extension will need to be installed at the beginning of the session and removed at the end. The extension ***should not*** be left installed for privacy and security reasons.

### Install the Secure Browser extension

1. **Log in** to the chromebook
2. Click the **circle menu** in the lower left corner of the screen
3. Click on the **Web Store** icon (you can use the search bar if it doesn't show up immediately)
4. Click **Extensions** in the upper-left part of the page
5. Click **Recommended** on the left side of the page  
    [![image (2).png](https://kb.princetonisd.net/uploads/images/gallery/2025-02/scaled-1680-/UZkRncLUsGpeviVN-image-2.png)
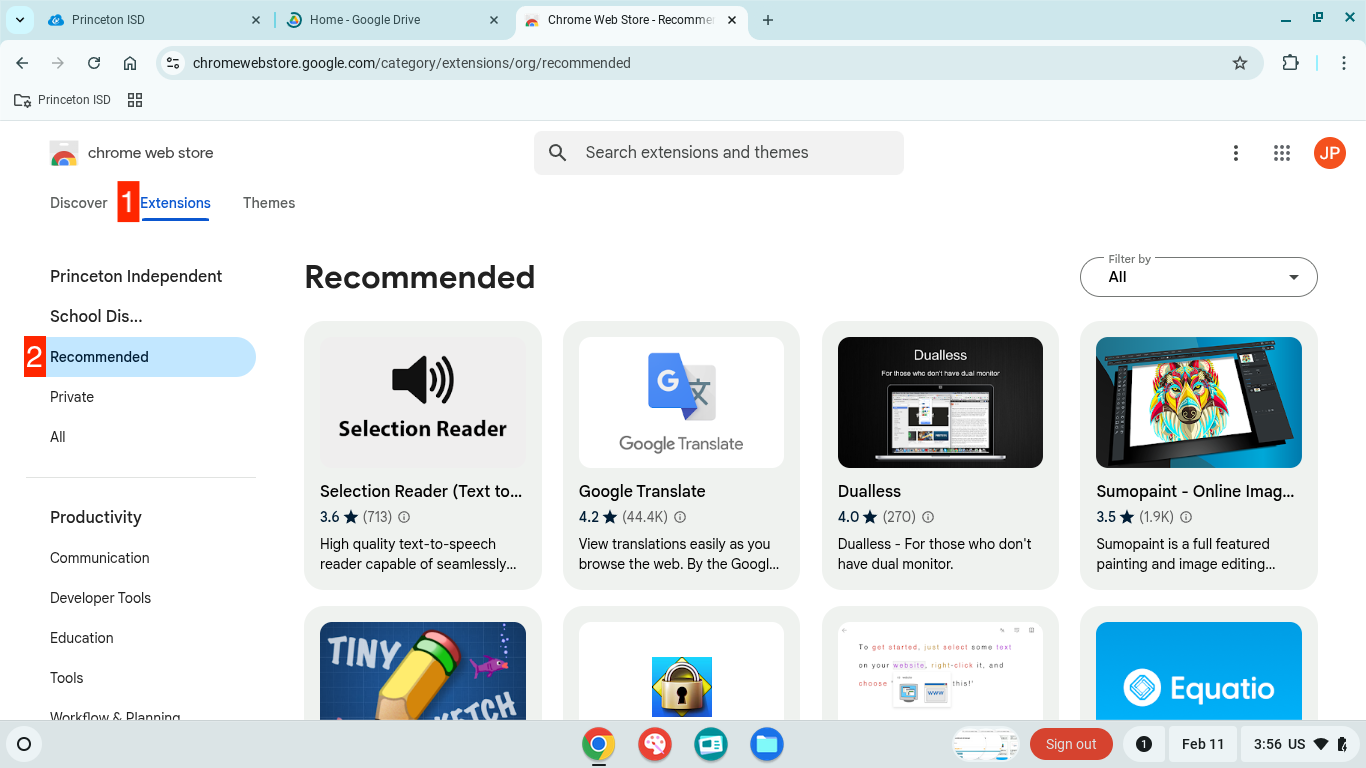
](https://kb.princetonisd.net/uploads/images/gallery/2025-02/UZkRncLUsGpeviVN-image-2.png)
6. Click **Eduphoria LockDown Browser**
7. Click **Add to Chrome**
8. Click **Add Extension**

<p class="callout warning">**After the test, make sure to remove the extension using the steps below.**</p>

### Remove the Secure Browser extension

1. Open **Chrome**
2. Click the **puzzle piece** icon on the right side of the top bar
3. Click the **snowman icon** next to **Eduphoria LockDown Browser**
4. Click Remove from Chrome[![image (1).png](https://kb.princetonisd.net/uploads/images/gallery/2025-02/scaled-1680-/JMVDkQM9kX8fuuTl-image-1.png)
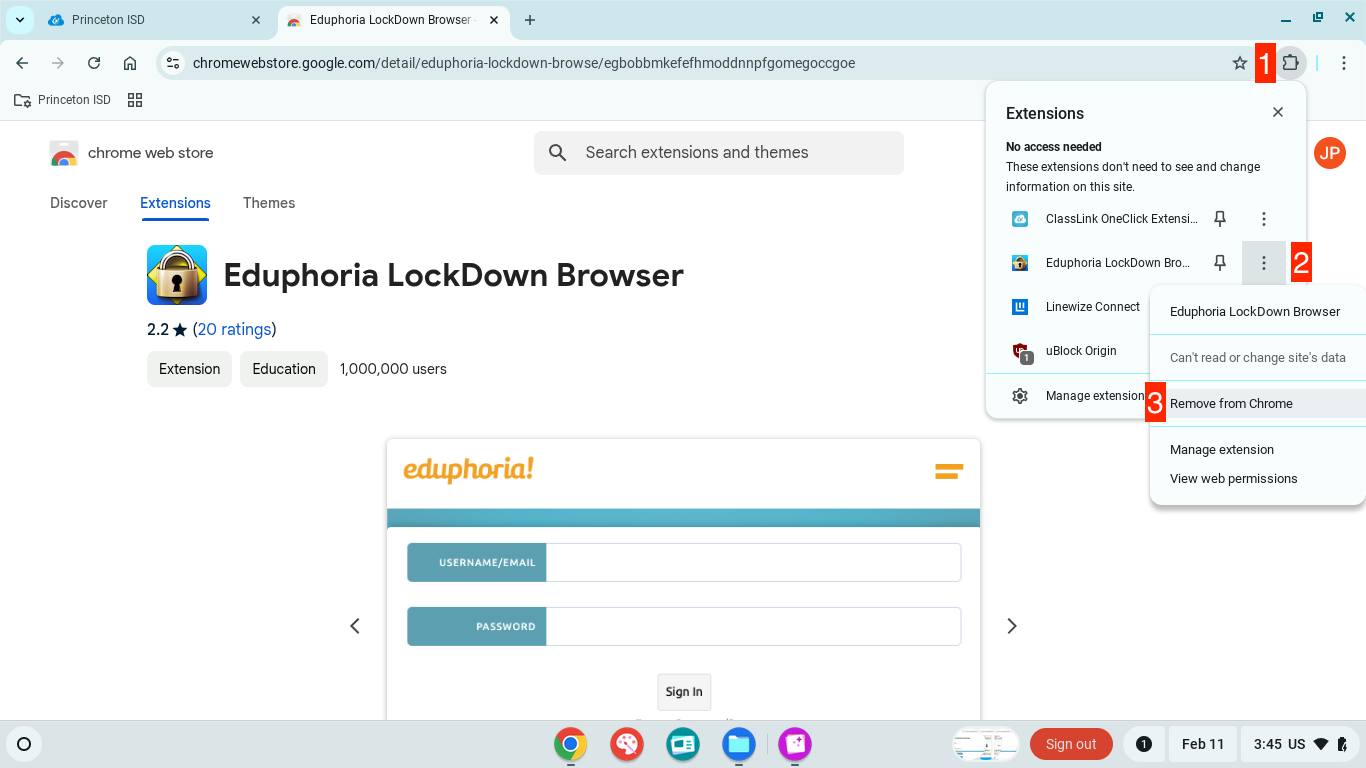
](https://kb.princetonisd.net/uploads/images/gallery/2025-02/JMVDkQM9kX8fuuTl-image-1.png)
5. Click Remove