We are currently working on the new phone system, so please check back for updates to the user experience.
If you have trouble or encounter an error with the instructions below, please place a helpdesk ticket, so we can look into the issue. Thank you in advance for your patience!
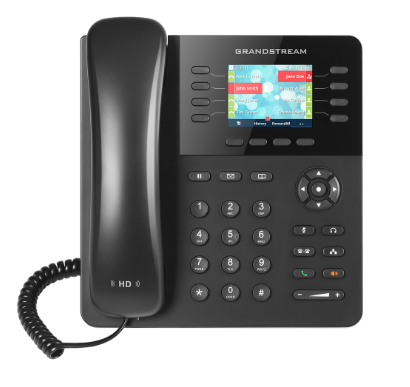 ### Calling #### Internal Dialing 1. Enter the extension 2. Pickup the handset to make the call 1. 1. For speaker phone, press the red speaker icon just above the volume up button #### External Dialing 1. Enter the number 10 digit external number 2. Pickup the handset to make the call 1. 1. For speaker phone, press the red speaker icon just above the volume up buttonYou are no longer required to enter a 8 or 1 before the external number.
### Call History 1. Press the button directly below the word *History* on the screen 2. Use the Up and Down arrow buttons around the circle to navigate the call history list 3. Use the Left and Right arrow buttons around the circle to navigate between the different history filters: 1. 1. All Calls 2. Answered Calls 3. Outbound Calls 4. Missed Calls 5. Transferred Calls 4. Press the buttons below the screen text to: 1. 1. Delete a call from the history 2. Clear all call history from the device 3. Dial a number from the call history 5. Press the button under the door icon to return to the main screen 1. 1. The phone will return to the main screen on its own if there's no interaction ### Internal Phone Directory #### Phone Directory Webpage The PISD Phone Directory Webpage is the primary means to search for a person's extension. This webpage is continuously updated, so the information is always accurate. Please refer to this page if you are having trouble reaching a person or room as their extension may have changed. 1. Login to the Classlink Launchpad 2. Select the *PHONE DIRECTORY* application 1.  2. Alternatively, you can enter [https://phones.princetonisd.net/staff-directory](https://phones.princetonisd.net/staff-directory) into your web broswer and use the sign-in with Classlink option 3. Select the Campus where you wish to search 1. This will list all the phones and their extensions for the chosen campus 2. You can narrow the results by entering information in the filter fields above each column #### Phone Local Directory The phone contains a local copy of the directory in the event you are unable to access the Phone Directory Webpage. 1. Press the button with the Book icon 1.  2. Press the Up arrow button in the navigation circle until you enter the Search Field 3. Press the button directly below the phrase *Quick* on the screen 4. Use number keys 2 through 9 to search by name 1. Pressing each number key will cycle through the alphanumeric characters 2. The results will automatically update when a new character has been entered 3. Press the button directly below the phrase *Exact* on the screen to reset the search 5. Use the Up and Down arrow buttons around the circle to navigate the results 6. Navigate to the desired person 7. Press the button directly below the phrase *Dial* on the screen to call them ### Voicemail #### Voicemail Setup 1. Dial \*98 + your extension 1. 1. EX: If your extension is 1234, you will enter \*981234 then place the call 2. Once prompted, enter your passcode followed by # 1. 1. The default passcode is 1000 3. Once prompted, use option 0 to enter the voicemail setup menu 4. Follow the prompts to customize your voicemail #### Checking Voicemail by Email All voicemail messages left by a caller will be emailed to your Princeton ISD email account. The email will be fromEmail is the primary means to access voicemail messages. Most extensions will not have voicemail messages sent to their phone. This section is only for special-use extensions that have the ability to check voicemails through their phone.
1. Dial \*98 2. When you hear the auto-attendant's voice, enter your extension followed by # 3. Once prompted, enter your passcode followed by # 4. Follow the prompts to navigate your voicemail box ### Transferring Calls #### Blind TransferBlind transfer will not give the person at the destination extension any notice they are about to receive a call.
1. Press the button directly below the word *Transfer* on the screen 1. 1. The caller will be placed on hold when the transfer button is pressed 2. Enter the extension that you want to transfer the caller to 3. Press the button directly below the phrase *BlindTrnf* on the screen 4. The caller has now been transferred **Using Contact Buttons on the phone's screen** 1. Press the button directly below the word *Transfer* on the screen 1. 1. The caller will be placed on hold when the transfer button is pressed 2. Press the *BlindTrnf* button 3. Press the button for the contact on your screen 4. The caller has now been transferred #### Attended Transfer 1. Press the button directly below the word *Transfer* on the screen 1. 1. The caller will be placed on hold when the transfer button is pressed 2. Enter the extension that you want to transfer the caller to 3. Press the button directly below the phrase *AttTrnf* on the screen 4. The other extension will need to answer your call 1. 1. If the other extension isn't answering: 1. 1. Press *Cancel* 2. Press *Resume* to take the caller off hold 2. If you get the voicemail for the other extension: 1. 1. Press *Split* 2. Press *End Call* 3. Press *Resume* to take the caller off hold 3. If the other extension answers, but is not able to accept the caller: 1. 1. Press *Split* 2. Press *End Call* 3. Press *Resume* to take the caller off hold 5. Once you are ready to transfer the caller, press the button directly below the word *Transfer* on the screen 6. The caller has now been transferred to the other extension **Using Contact Buttons on the phone's screen** 1. Press the button directly below the word *Transfer* on the screen 1. 1. The caller will be placed on hold when the transfer button is pressed 2. Press the *AttTrnf* button 3. Press the button for the contact on your screen 4. The other extension will need to answer your call 1. 1. If the other extension isn't answering: 1. 1. Press *Cancel* 2. Press *Resume* to take the caller off hold 2. If you get the voicemail for the other extension: 1. 1. Press *Split* 2. Press *End Call* 3. Press *Resume* to take the caller off hold 3. If the other extension answers, but is not able to accept the caller: 1. 1. Press *Split* 2. Press *End Call* 3. Press *Resume* to take the caller off hold 5. Once you are ready to transfer the caller, press the button directly below the word *Transfer* on the screen 6. The caller has now been transferred to the other extension #### Transfer Directly to Voicemail 1. Press the button directly below the word *Transfer* on the screen 1. 1. The caller will be placed on hold when the transfer button is pressed 2. Enter \* + the extension to send the caller to 3. Press the button directly below the phrase *BlindTrnf* on the screen 4. The caller has now been transferred to the voicemail box for that extension **Using Contact Buttons on the phone's screen** 1. Press the button directly below the word *Transfer* on the screen 1. 1. The caller will be placed on hold when the transfer button is pressed 2. Press the *BlindTrnf* button 3. Enter \* 4. Press the button for the contact on your screen 5. The caller has now been transferred to the voicemail box for that extension ### Holding Calls 1. Press the pause button directly above the number 1 1. 1. This will place the caller on hold 2. Press the resume button to continue the callCalls on hold are only held for 5 minutes. Please do not keep calls on hold for an extended period of time.
### Do Not Disturb (DND)DND sends ALL calls straight to voicemail.
DND does not record missed calls in the call history.
Do Not Disturb (DND) mode is used to block all incoming calls. To enable/disable DND, press the mute icon (). While enabled, a red sign with Do Not Disturb text is displayed over the screen. Additionally, DND sends ALL calls sent straight to voicemail, and it does not retain a record of missed calls! To disable DND, press the mute icon again (). ### Forward All Calls #### Enable Call Forwarding 1. Press the button directly below the word *Features* on the screen 2. Navigate to the account with your name 1. 1. This will be Account 1 for most people 2. Use the up and down arrows in the navigation circle to change the selected account 3. Press the center button in the navigation circle 1. 1. This is the circular button surrounded by arrow buttons 4. Navigate to the *Forward All (\*72)* option 5. Press the center button in the navigation circle 6. Enter the number to forward your calls to 1. 1. Enter the number exactly as you would normally dial it to make the call 7. Press the button directly below the word *OK* on the screen 8. The phone should beep and begin forwarding all calls from your extension 1. 1. Call Forwarding is enabled if you see a phone handset icon with a right-pointing arrow in the upper-right corner of the screen #### Disable Call Forwarding 1. Press the button directly below the word *Features* on the screen 2. Navigate to the account with your name 1. 1. This will be Account 1 for most people 2. Use the up and down arrows in the navigation circle to change the selected account 3. Press the center button in the navigation circle 1. 1. This is the circular button surrounded by arrow buttons 4. Navigate to the *Canceled Call Forward Always (\*73)* option 5. Press the center button in the navigation circle 6. The phone should beep and stop forwarding calls 1. 1. Call Forwarding is still enabled if you see a phone handset icon with a right-pointing arrow in the upper-right corner of the screen ### Pairing Bluetooth DevicesIf your campus is looking to purchase a bluetooth device for calling, please have them contact the Technology department for a list of recommended devices.
This phone can be connected to a bluetooth device (such as a headset or ear buds) for hands-free calling. The interoperability of features between the phone and the bluetooth device will vary depending on the bluetooth device being used. This section will show the steps that need to be taken on the phone to pair a bluetooth device. 1. Press the center button in the navigation circle 1. 1. This is the circular button surrounded by arrow buttons 2. Navigate to the *System* icon 1. 1. Press the right arrow button 3 times to get there 2. When navigating, the selected icon will be brighter than the other icons 3. Press the center button in the navigation circle 4. Navigate to the *Bluetooth* option 5. Press the center button in the navigation circle 1. 1. The Bluetooth screen may take a few seconds before you can navigate on the screen 6. Navigate to the *Start Scan* option 7. Press the button directly below the word *Select* on the screen 8. Place your Bluetooth device into pairing mode 1. 1. Please follow your manufacturer's instructions to do this 9. Press the button directly below the word *Rescan* on the screen 10. Navigate to your Bluetooth device 11. Press the button directly below the word *Pair* on the screen 1. 1. A PIN will appear on the Phone's screen in case your device requires a PIN to connect ### Reset Phone There are several issues that can be resolved by resetting the phone. These instructions will guide you through the process. This is a great way to troubleshoot a phone issue before placing a ticket with the technology helpdesk. 1. Press the center button in the navigation circle 1. 1. This is the circular button surrounded by arrow buttons 2. Navigate to the *System* icon 1. 1. Press the right arrow button 3 times to get there 2. When navigating, the selected icon will be brighter than the other icons 3. Press the center button in the navigation circle 4. Navigate to the *Factory Reset* option 1. 1. Use the up and down arrow buttons in the navigation circle 2. This should be the last option in the list 5. Press the center button in the navigation circle 6. You will be prompted to *Start factory reset now?* 7. Press the button directly below the word *Yes* on the screen 8. The phone will begin to reboot 1. 1. The phone should reboot and return to normal within 2-3 minutes 2. If you're still having issues with your phone, please place a ticket with the technology helpdesk