General
- Adobe Flash
- Clear a Web Page Cache
- Create a Password Protected Document
- OpenVPN Setup
- Manage Student Passwords
- Standardized Testing
- Use Gmail to Open Email Links
- Use the App Portal on Windows
- Use the Knowledge Base
- Virtual Student How-To
- Record Yourself with VLC
- Login Cheat Sheet
- Login Cheat Sheet for Substitutes
- Activate Unity
- Multi Camera Video Playback (Unifi)
- Adobe CC Self Service Install
- Daycare Guardian Camera Access
- Unifi Endpoint Setup
- STAAR Secure Browser Pre-Check
Adobe Flash
Notice: Adobe Flash Player support has been fully removed from all major web browsers as of December 2020. There is no longer any way to enable Flash content on websites. The official announcement from Adobe which links to official announcements from all major browsers is available here.
Clear a Web Page Cache
Sometimes updates to a website will cause the site to appear broken for people who have previously visited the site. This is usually caused by caching. The quickest way to fix the issue is to clear your cache for the website that is not working correctly.
- Navigate to the web page that is not working
- Navigate to Menu > More tools > Developer tools OR press Ctrl + Shift + I

- Right Click on the Refresh button
- Click Empty Cache and Hard Reload

- Click the small X in the top-left of the developer tools sidebar to close Developer Tools

Create a Password Protected Document
Overview
This guide will show you how to create a document in Microsoft Office(Word, PowerPoint, Etc.)that requires a password to view. This can be useful to protect documents from being opened until a password is provided, such as for testing.
How to add a password to an Office document
This tutorial is specific to Microsoft Word, but the same options are available in all Office products(Word, Excel, PowerPoint, Etc.)
PLEASE NOTE: We strongly recommend saving a separate backup copy of the document that you do not intend to share before adding a password in case the password is lost.
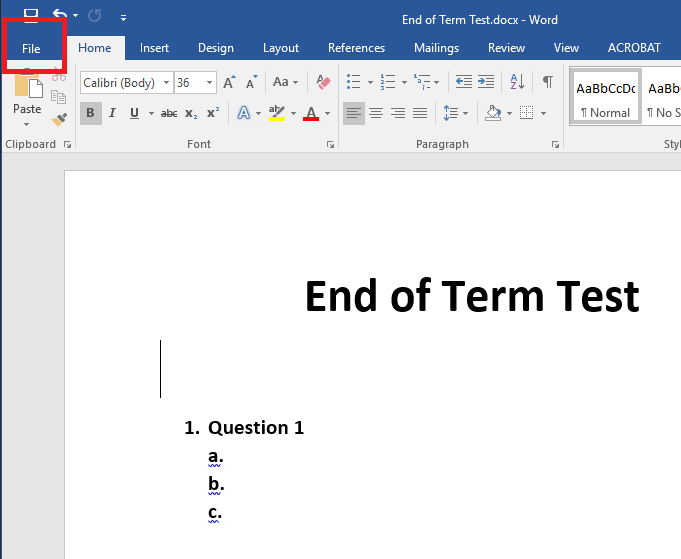
First, Open your document that you want to lock with a password.
Click File in the top left corner to access file options
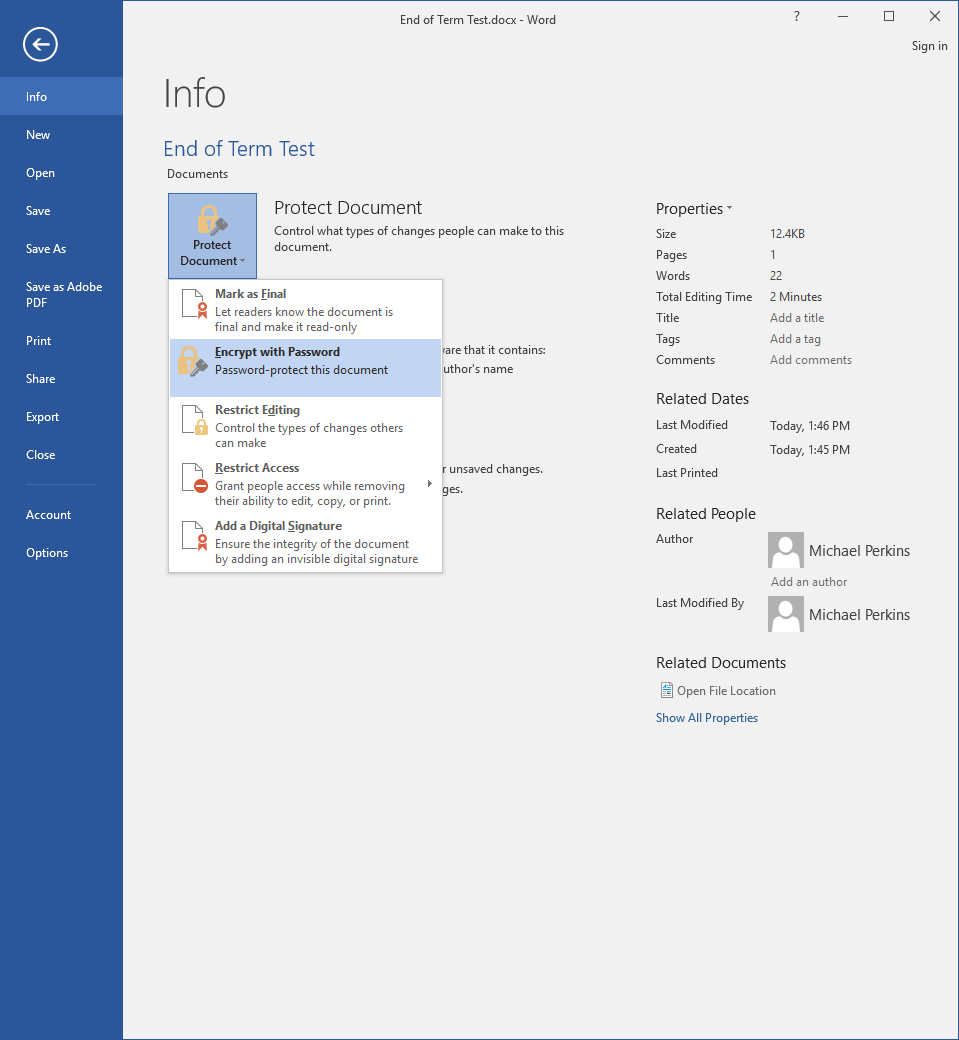
Click Protect Document and select Encrypt with Password. [Note: In other documents, the Protect option might be slightly different. For instance, in PowerPoint the option is called Protect Presentation. It will do the same thing.]
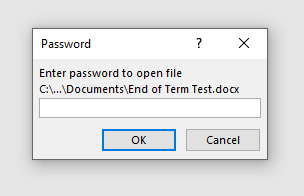
When prompted, enter a password for this document. PLEASE NOTE: This password is case sensitive. Once a password is set, you will not be able to open or modify the document again without entering the password, so the password should be either one that is easy to remember or should be documented so that it is not lost.

Save your document again to verify that the document is save with your password.
The next time the document is opened, it will prompt for a password before the content can be viewed. Enter the password and click OK to view the document.
If you run into any issues in setting a password on your Office document, please submit a help-desk ticket through Eduphoria and a technician will be able to assist you.
OpenVPN Setup
Some networks restrict VPN usage. If you are experiencing issues, see the troubleshooting section below.
Setup
- Go to https://vpn.princetonisd.net in a web browser and log in with your computer credentials
- Note: You must be on the district network to complete this step. If you need immediate access and are off-site please call (469) 952-5414
- Note: If you are unable to log in, please put in a HelpDesk ticket to request access.
- Note: You must be on the district network to complete this step. If you need immediate access and are off-site please call (469) 952-5414
- Log Out or close the tab
- Download and install OpenVPN Connect from https://openvpn.net/client/
- Download the PISD-VPN.ovpn profile attached to this article (left side of the page or Info tab)
- Open OpenVPN Connect
- Click Upload File
- Click Browse
- Browse to and open the VPN profile from step 4
- Enter your computer username in the Username field
- Check the Save password box
- Enter your computer password in the Password field
- Click Connect to save changes
Connect
- Open OpenVPN Connect
- Click the on the VPN profile listed
- Enter credentials if prompted
Troubleshooting
Unable to connect to VPN
If you're unable to connect to VPN try the following.
- Reinstall OpenVPN Connect
- Starting with step 4, attempt to use the PISD-VPN_Alternate profile instead of PISD-VPN
Unable to access the OpenVPN website
Some networks block VPN related websites. Use our alternate links below.
Manage Student Passwords
Teachers and designated campus managers have the ability to manage passwords for students under their care.
Access the Rostering Portal
- Log in the ClassLink
- Click on Rostering Portal (SSO)
Print student logins
- In the Rostering Portal, go to the Students page
- Select the students you want to include (optional)
- In the upper-right of the student list, click the printer icon
- A printable PDF will be generated
Reset a student's password
- In the Rostering Portal, go to the Students page
- Find the student and click the key icon on the far right side of their row
- Make a note of the new password displayed
- Click Reset Password
Reset multiple students' passwords
- In the Rostering Portal, go to the Students page
- Select the students you want to include
- In the upper-right of the student list, click the key icon
- Make a note of the new passwords displayed for each student (or click the printer icon)
- Click Reset Password
Standardized Testing
Chromebooks
When using a Chromebook for standardized testing there is no need to log in. Click the Apps button at the bottom of the login screen and select the desired test. From there, follow instructions for the specific test which should be located in the testing manual.
Lab Computers
Some computer labs contain Chromeboxes. These labs will have the computers attached to the back of the screen. Use the procedures for Chromebooks when working in these labs.
For TELPAS testing, the testing application is called TestNav. Searching for TELPAS is unlikely to return any results.
When using a lab computer for standardized testing, you must log in with the credentials below. From there, locate the desired test icon on the desktop. If no shortcut appears on the desktop, open the start menu and search for the test there.
Username: test
Password: test.test
Use Gmail to Open Email Links
In order to open Email (mailto) links, Gmail must be allowed to act as a service handler. This tutorial explains how to do that.
- Open Google Chrome
- Go to gmail.com
- In the address bar, click the Service Handler button (see below)

- Click Allow then click Done

- Email links will now open in Gmail
Use the App Portal on Windows
Princeton ISD provides an app portal which can be accessed from district machines to install district software through a self-service process. For the purpose of this tutorial, Google Drive File Stream will be used but the process is the same for every item in the app portal.
- Click on the FileWave Kiosk icon in the application tray which is in the lower-right corner of the screen. It should look something like the below picture.

If the FileWave Kiosk does not appear, click the caret icon (see below) to expand the list.
The result should look like the below image.
- Once the FileWave Kiosk has launched a list of applications is shown. If you do not see the application you are looking for use the search box in the upper-right corner. Since this tutorial uses Google Drive File Stream, we will type file stream and hit enter. Doing so returns one result as shown below.

- To install an application, click the Install button to the right of that application. Depending on the application it may take a long time to complete. Once the application is installed, the Install button will change to an Uninstall button as shown below.

- Repeat the process for any additional applications that you want to install.
Use the Knowledge Base
Navigation
Getting Started
The knowledge base is organized into books and chapters. The best place to begin browsing at the books page. There is a link labeled Books on the blue bar at the top of the page. Alternatively, click the image below.

Books and Chapters
Within Book, Chapters, and Pages, a module is displayed on the left side of the screen labeled BOOK NAVIGATION. This module displays a tree view of your current position within the knowledge base. It can be used to navigate easily to another spot in the tree.

Pages
In addition to the BOOK NAVIGATION module, a Page Navigation module is displayed in Page view. This allow for quick navigation to the relevant portion of a given page. For example, in the following article, it is easy to navigate quickly to the "Visualizer is not connected!" troubleshooting steps by simply clicking the link.

Search
The best place to start looking for a solution is to use the search bar at the top of the page. Enter some text and then hit the Enter/Return key to search. Results can be further refined by using the tools on the left side of the results page.

Logging In
Some Knowledge Base articles contain information that should not be visible to students. In order to view these articles, you need to be logged in using the same credentials you use to log in to your computer.
- Click the Log In button in the upper-right corner of the screen.

- Click LOGIN WITH CLASSLINK.
Virtual Student How-To
Log in to Google Chrome for school
Log in to ClassLink
Log in to Google Classroom
Join a Class in Google Classroom
Join a Live Google Meet Class
Using Google Meet
Complete and Turn in Google Slides Activity
Complete and Turn in a Google Docs Activity
Log in to SeeSaw
Log in to BrainPopJr
Edgenuity
Assignment with no Attachement
Make a Copy of an Attached File
HyperDoc Spanish Assignments
Record Yourself with VLC
It is possible to use VLC to capture audio and video from your webcam to a video file. To do so, follow the instructions below.
- Open VLC media player
- Click Media > Open Capture Device (or press Ctrl + C)
- From the Video device name dropdown, select your camera.
- From the Audio device name dropdown, select your audio device.
- Click the arrow next to the Play button and click Convert (or press Ctrl + O)
- If you want to see yourself as you record, check the Display the output box in the Settings section.
- In the Destination section, click Browse.
- Browse to the location where you want your video to be saved and enter a name in the File name field.
- Click Save then click Start
- Once you are finished recording, click the Stop button at the bottom of the VLC window.
Login Cheat Sheet
This document is intended for staff members. If you are a substitute teacher, please click here.
Overview
Princeton ISD uses multiple systems that you may be required to use. This document outlines some of the more common systems and how to access them. If you are unsure which systems pertain to you, please see your supervisor for more information. If you are having trouble accessing a system that you need, please create a Helpdesk ticket in Eduphoria. You may also contact the Technology Helpdesk at extension 2099 or (469) 952-5414
Terms
ClassLink
ClassLink is the main portal for the district. It contains links to to most of the systems that are used across the district. You can learn more about ClassLink by clicking here.
ClassLink SSO
ClassLink SSO means that the app uses ClassLink to sign you in. That means that as long as you launch the app from ClassLink, you will be signed in automatically.
Google SSO
Google SSO means that the app uses Google to sign you in. That means that, as long as you are signed in to your Princeton ISD Google account, you should be able to use the Sign in with Google button on the website to log in without a password.
Quick Reference Table
This section is intended as a quick reference. For more information about these resources, please scroll down.
| System | Typical Username | Default Password | POC for Access Issues |
| District Computer | FirstName.LastName | Welcome Email from noreply@princetonisd.net |
Technology (469) 952-5414 |
| Classlink | Same as Computer Login | Same as Computer Login |
Technology (469) 952-5414 |
| Google Services (including Gmail) | Classlink SSO | Classlink SSO |
Eduphoria Ticket |
| Infinite Campus | Classlink SSO |
Classlink SSO |
Campus PEIMS coordinator or KPerkins@princetonisd.net |
| PISD Website |
<First Initial><Surname> or FirstName.LastName |
P@nthers |
Eduphoria Ticket (District Website category) |
| Eduphoria | Classlink SSO | Classlink SSO |
Technology (469) 952-5414 |
| SmartFind Express | Employee ID | Employee ID | payroll@princetonisd.net |
| Employee Access | Google SSO |
Google SSO |
payroll@princetonisd.net |
| TalentEd |
Google SSO |
Google SSO |
payroll@princetonisd.net |
| Teks Resource System | Self registration |
Self registration |
Instructional Coach |
| TimeClock Plus | Employee ID | N/A |
payroll@princetonisd.net |
| EduHero | Google SSO | Google SSO |
Eduphoria Ticket |
District Computers & Classlink
The credentials for your computer login and Classlink are the same. You should receive these through the Welcome email from noreply@princetonisd.net when you are hired. The Welcome email is sent to your personal email address on file with HR. If you need a new welcome email sent to you, please contact Technology at (469) 952-5414.
URL: https://classlink.princetonisd.net
Typical Username: FirstName.LastName (e.g. Princeton.Panthers)
Default Password: Check Welcome email from noreply@princetonisd.net
POC for Access: Technology Helpdesk
PLEASE NOTE: The username is not your email address. Do NOT include the '@princetonisd.net' or the login will fail.
Gmail & Other Google Services
Gmail and other Google services (e.g. Google Drive, Google Meets, etc) can be accessed by using the icons in Classlink. Under ideal circumstances, you will be logged into that Google service without any further effort.
There may be times when you're prompted for an email address to login. Please enter your PISD email address. This should redirect you to the Classlink login page where you can enter your Classlink credentials. You should then have access to the Google service. For more information on this, please visit the knowledge base article here.
Username: Classlink SSO
Password: Classlink SSO
POC for Access: Eduphoria Ticket or Technology Helpdesk
Substitute Teachers do not have access to Google services, however your email address can still be used for logging into other services that use Google to sign in.
Infinite Campus
URL: https://princetontx.infinitecampus.org/campus/princeton.jsp
Typical Username: Classlink SSO
Default Password: Classlink SSO
POC for Access: Campus PEIMS Coordinator or Ms. Kristin Perkins (KPerkins@princetonisd.net)
Princeton ISD Website
The Princeton ISD website is where your teacher webpage exists. You can login to this site to create and update your webpage.
URL: https://www.princetonisd.net/
Typical Username: First Initial & Surname (e.g. PPanthers) or FirstName.LastName (e.g. Princeton.Panthers)
Default Password: P@nthers
POC for Access: District Webmaster, Ms. Katie Guinn (katie.guinn@princetonisd.net).
Eduphoria
This platform is used for multiple purposes including Testing, Staff Evaluations, and Maintenance/Technology Tickets. This system can be accessed by using the Eduphoria Icon in the Classlink launchpad.
URL: https://princeton.schoolobjects.com/
Username: Classlink SSO
Default Password: Classlink SSO
POC for Access: Technology Helpdesk
SmartFind Express
This system is used to request time off and substitute teachers.
URL: https://princetonisd.sfe.powerschool.com/logOnInitAction.do
Typical Username: Employee ID
Default Password: Employee ID
POC for Access: payroll@princetonisd.net
If you have never logged into this account, you MUST call (469) 717-4561 to setup your account. PLEASE NOTE: you MUST call from a personal phone number; this CANNOT be done with a district phone. After completing this phone setup, you will be able to access your account through the login page.
Having trouble logging in? See view the "Flowchart - PowerSchoolAccountAccess" PDF file attached to this article. This ONLY works if you have already setup your account through the phone number.
Employee Access
This platform manages personal information and can be used to track Salary/Benefits information.
URL (Former Employees): https://efp224eac.efinanceplus.powerschool.com/eFP22.4/EmployeeAccessCenter/Web/Default.aspx?profile=f2e239b1-4360-4f50-8592-342d2b570d4c
Typical Username: Google SSO
Default Password: Google SSO
POC for Access: payroll@princetonisd.net
Having trouble logging in? See view the "Flowchart - PowerSchoolAccountAccess" PDF file attached to this article
TalentEd (Employee Records)
This platform is used to fill out employee documents including on-boarding documents, contract renewals, and other employee record-keeping.
URL: https://princetonisd.tedk12.com/records
URL (On-Boarding): https://princetonisd.tedk12.com/sso/newhire
Username: Google SSO
Password: Google SSO
POC for Access: payroll@princetonisd.net
New hire employees should use the On-Boarding URL. Once your account has been fully setup, you can access your employee records with the normal URL and your PISD email address.
Having trouble logging in? See view the "Flowchart - PowerSchoolAccountAccess" PDF file attached to this article
TEKS Resource System
Access TEKS resources. This system is mostly intended for teachers.
Typical Username: Self registration
Default Password: Self registration
POC for Access: Instructional Coaches
You can reset your password for this system by selecting the Forgot Password option, and entering your PISD email address. It will send an email to your PISD inbox with instructions to reset the password.
TimeClock Plus
This is the system for tracking employee work hours (for positions that require it).
URL: https://274066.tcplusondemand.com/app/webclock/#/EmployeeLogOn/274066/1
Username: Employee ID
POC for Access: payroll@princetonisd.net
Instructions for setting up the mobile app can be found at https://kb.princetonisd.net/books/timeclock-plus/page/mobileclock-app-installation-and-setup
Time Clock Managers can access their dashboard from https://274066.tcplusondemand.com/app/manager/#/ManagerLogOn/274066
EduHero
This system is used for professional development courses.
URL: https://eduhero.net/promo.php
Username: Google SSO
Default Password: Google SSO
POC for Access: Technology Helpdesk
Login Cheat Sheet for Substitutes
If you are a long-term sub or an employee, please see the full cheat sheet.
Overview
This document outlines how to access the district systems that substitutes need to use. If you are unable to access one of these systems, please call (469) 952-5414 for assistance.
First Steps
All of the systems that subs need use Google to log in so the first step is to get logged in to Google.
- If you are using a personal device, open an Incognito/Private tab in your browser
- Log in the ClassLink (https://classlink.princetonisd.net).
- If you are unsure how to log in to ClassLink, please see the welcome email you were sent when you were hired. If you no longer have access to that email, please contact technology at (469) 952-5414 to have a new welcome email sent.
- Click on Gmail (SSO)
- If prompted, click I understand
- You will be taken to a page that says you do not have access to Gmail. That means it worked.
- Close the tab and return to ClassLink. You are now able to log in to other services that use Google to sign in.
PLEASE NOTE: The username is not your Google account. Do NOT include '@princetonisd.net' in your username
EduHero
Access trainings required by the district.
If you have not completed the steps in the First Steps section, please do that first.
- Log in to ClassLink (https://classlink.princetonisd.net)
- Click EduHero
- Click Sign in with Google
- If prompted, select your princetonisd.net Google account from the list
SmartFind Express
Find and accept sub jobs.
If you have never logged into this account, you MUST call (469) 717-4561 to setup your account. PLEASE NOTE: you MUST call from a personal phone number; this CANNOT be done with a district phone. After completing this phone setup, you will be able to access your account through the login page.
If you have not completed the steps in the First Steps section, please do that first.
- Log in to ClassLink (https://classlink.princetonisd.net)
- Click SmartFind Express
- If you have never logged in to SmartFind before, please complete the steps on the left side of the page to set up your account
- Click Google
- If prompted, select your princetonisd.net Google account from the list
Employee Access
View and update your personal information. Access pay stubs.
If you have not completed the steps in the First Steps section, please do that first.
- Log in to ClassLink (https://classlink.princetonisd.net)
- Click Employee Access
- Click Sign in with Google
- If prompted, select your princetonisd.net Google account from the list
Talent Ed
Apply for district jobs and sign district documents.
If you have not completed the steps in the First Steps section, please do that first.
- Log in to ClassLink (https://classlink.princetonisd.net)
- Click TalentEd
- Click Sign in with Google
- If prompted, select your princetonisd.net Google account from the list
Activate Unity
Unity is installed automatically where required but activation must be completed by the end-user using the following steps.
- Open Unity Hub
- Open Unity
- When prompted, click Open Hub
- Click the user profile button in the top-right of Unity Hub and click Sign in
- Click the Google logo and follow the process to sign in with your Princeton ISD account
- Click on the cog in the top-right corner of Unity Hub
- Click License Management
- Click ACTIVATE NEW LICENSE
- Select Unity Plus or Pro
- Enter E4-NJY2-XMK3-VZAY-YDQU-UE6H in the serial number field
- Click Done
- You should now be able to use Unity
Multi Camera Video Playback (Unifi)
- Click the link in the table below that corresponds to the campus you're looking for.
- You will see a message that states your connection is not private
- Click on Advanced on the bottom left and then click Proceed to 10.xxx.246.1 (unsafe).
- Go to Playback and choose the first camera that you want to watch.
- Then look on the bottom right hand side of the video feed and you should see a symbol that looks like 3 squares and a plus sign and go ahead and click on that.
- You will then be prompted to choose up to three more cameras. You can only look at up to 4 cameras at a time like this. The rest is just like you normally scrub through camera feeds.
If you have any questions please reach out to Jonathon Yakel or call me at extension 3471.
| Campus | IP |
|---|---|
| Lovelady Indoor | 10.144.246.1 |
| Lovelady Outdoor | 10.144.246.2 |
| Clark | 10.136.246.1 |
| Lacy | 10.64.246.1 |
| Godwin | 10.68.246.1 |
| Harper | 10.72.246.1 |
| Smith | 10.76.246.1 |
| Lowe | 10.80.246.1 |
| Canup | 10.132.246.10 |
| DAEP | 10.132.246.11 |
| Daycare | 10.132.246.253 |
| Green | 10.88.246.1 |
| James | 10.92.246.1 |
Adobe CC Self Service Install
When signing in to Adobe, do not use the Sign in with Google option. Enter your Princeton ISD email and continue through the prompts to sign in.
- Go to Apps in Windows Settings and remove every Adobe app that is currently installed.
- Open CMD as administrator and paste the following line then hit Enter
\\share\techpublic\_Apps\Adobe\ACC_SelfService_Windows_en_US_WIN_64\ACC_SelfService_Windows\Build\setup.exe - Go to creativecloud.adobe.com and sign in with a Princeton email. (Do not sign in with Google)
- Click on the user button in the top-right of the screen.
- Click Install Creative Cloud Desktop and install the application that downloads.
- Once Creative Cloud is installed, you should be able to open it, sign in, and download any Adobe products
Daycare Guardian Camera Access
Access Rules
Access to Daycare cameras is to be assigned only to the legal guardian(s) of the child. Access is to be assigned only to the camera(s) located in the room that the guardian's child is assigned to. A guardian should never be assigned access to a camera that is in a common area or anywhere outside the room where their child is assigned. No person other than a legal guardian of a child enrolled in the daycare should have access to any camera for any reason.
If a child withdraws from daycare their guardians' access must be removed immediately. If any person ceases to be the legal guardian of a child enrolled in daycare, the former guardian's access must be removed immediately.
Creating a User
- Open the camera system
- Navigate to the Admins & Users page
- Click Create New then Create New User
- Enter the First Name, Last Name, and Email address
- Click Create
Add Camera Access
- Open the camera system
- Navigate to the Admins & Users page
- Select the user you wish to assign camera access to
- Click on the gear icon below the user's name in the panel on the right
- Under Assignments, check the box next to Protect
- Click Add Shared Cameras
- Check the box(es) next to the appropriate camera(s)
- Click Add
- Click Apply Changes
- If prompted, click the button to send an invitation
Remove Camera Access
- Open the camera system
- Navigate to the Admins & Users page
- Select the user you wish to assign camera access to
- Click on the gear icon below the user's name in the panel on the right
- Under Assignments, hover over the camera you with to remove
- Click the trash can icon to the right of the camera you wish to remove
- Click Apply Changes
Unifi Endpoint Setup
Initial Setup
If you experience login problems in the initial setup, disconnect from the Princeton ISD network and try again. Once set up, you will not need to do this again.
iOS
- From the App Store, install the UniFi Endpoint app
- Once UniFi Endpoint is installed, click this link to set up your account
- Your username will be your Princeton ISD email address
- Your password will be the password you use to log in to ClassLink
- If prompted, the domain is pisd.
Android
- From the App Store, install the UniFi Endpoint app
- Once UniFi Endpoint is installed, click this link to set up your account
- Your username will be your Princeton ISD email address
- Your password will be the password you use to log in to ClassLink
- If prompted, the domain is pisd.
Set up Facial Recognition
Facial recognition is highly sensitive to contrast and may not work well with all lighting conditions.
- Open the UniFi Endpoint app
- Make sure the Princeton ISD organization is selected in the dropdown at the top of the page
- Tap the gear icon
- Tap Face Photo and follow the instructions to set up a face photo
- It may take up to 15 minutes for facial recognition to begin working
Touch Pass (Invitation Required)
Some door readers are not compatible with TouchPass. If your device prompts you to select a credit card, the reader is not compatible. These readers can be used with the Tap to Unlock feature of the Endpoint app on the phone but can not be unlocked by a wearable device.
- Open the UniFi Endpoint app
- Make sure the Princeton ISD organization is selected in the dropdown at the top of the page
- Tap the gear icon
- Tap Touch Pass and follow the instructions to set up your Touch Pass
- It may take up to 15 minutes for Touch Pass to begin working
- If you are syncing your credential to a wearable device, it may take several minutes to appear on the wearable device
Video Doorbell
If you need to respond to the video doorbells from your phone, please email helpdesk@princetonisd.net to be set up. Once that is complete, doorbell calls will route to the UniFi Endpoint app on your device.
STAAR Secure Browser Pre-Check
Check WiFi is able to connect to PISD
- Start the Chromebook
- On the login page, click the button in the lower-right corner of the screen
- Click the WiFi button and select PISD (if not already connected to PISD)
- If the device is unable to connect to PISD, the device needs to be checked by Technology
Check Secure Browser Versions
- Start the Chromebook
- Click the Apps menu at the bottom of the login screen
- Click SecureTest
- If prompted, select Texas as the sate and click OK
- Once the browser loads, the version will be displayed in the top-right corner of the screen. If the browser does not load or the version is not Secure v10.1 or greater, the device needs to be checked by Technology